

Server Actions in Next.js 14: A Comprehensive Guide
Server Actions in Next.js 14 streamline server-side logic by allowing it to be executed directly within React components, reducing the need for separate API routes and simplifying data handling.
By Aakash Kumar · · 5 min read

Next.js 14 introduced Server Actions, a powerful feature that allows developers to handle asynchronous operations on the server. This capability is a game-changer for both product development and building efficient, scalable applications. In this guide, we are going to explore Server Actions in detail, so let’s start with it.
Introduction to Server Actions
Server Actions in Next.js 14 are asynchronous functions running on the server, designed to handle tasks like data mutations and form submissions. While they can fetch data, Next.js recommends fetching data directly in server components for better efficiency. These server actions can be invoked from both Server Components and Client Components, making them versatile for seamless integration in software development workflows.
But what are the Advantages of using Server Actions?
Security: Sensitive operations and data stay on the server.
Performance: Offloads processing to the server, reducing client workload.
Convenience: Simplifies code by keeping server logic within the Next.js framework.
Defining Server Actions
To define a Server Action, use the use server directive at the top of an asynchronous function. This directive can be placed inside a function or at the top of a module to mark all exports as Server Actions.
// app/actions.ts 'use server'; export async function createUser(formData: FormData) { // Process form data on the server const user = await db.users.create({ data: formData }); return user; }In this example, createUser is a Server Action that processes form data and creates a user in the database.
Using Server Actions in Server Components
Server Components are the one that render on the server, We can call Server Actions directly within them.
import { createUser } from './actions'; export default function Page() { const handleSubmit = async (formData: FormData) => { await createUser(formData); }; return ( <form action={handleSubmit}> <input type="text" name="username" required /> <button type="submit">Create User</button> </form> ); }
In this example, the form submission is handled by the createUser Server Action, which processes the data on the server.
Using Server Actions in Client Components
Client Components are the components which are rendered on the client. We can only import actions marked with the module-level use server directive. This allows us to call Server Actions from Client Components securely.
// app/actions.ts 'use server'; export async function createUser(formData: FormData) { const user = await db.users.create({ data: formData }); return user; }// app/client-component.tsx 'use client'; import { createUser } from './actions'; export default function ClientComponent() { const handleSubmit = async (event) => { event.preventDefault(); const formData = new FormData(event.target); await createUser(formData); }; return ( <form onSubmit={handleSubmit}> <input type="text" name="username" required /> <button type="submit">Create User</button> </form> ); }
Here, createUser is a Server Action called from a Client Component, handling form submission and data processing on the server.
Server Actions will be called even if the javascript isn’t loaded or it is disabled. They can be called not just in Form but can be invoked from event handlers, useEffect hooks or any other 3rd -party library making them quite flexible and easy to use.
Advanced Usage of Server Actions
Server Actions can be utilized in various advanced scenarios, including handling optimistic updates, error handling, and revalidation.
Optimistic Updates
Optimistic updates allow the UI to update immediately while the Server Action is still processing. This will enhance the user experience by providing instant feedback.
// app/page.tsx 'use client'; import { useOptimistic } from 'react'; import { createUser } from './actions'; export default function Page() { const [optimisticUser, setOptimisticUser] = useOptimistic(null, (state, user) => user); const handleSubmit = async (event) => { event.preventDefault(); const formData = new FormData(event.target); const newUser = { username: formData.get('username') }; setOptimisticUser(newUser); await createUser(formData); }; return ( <div> <form onSubmit={handleSubmit}> <input type="text" name="username" required /> <button type="submit">Create User</button> </form> {optimisticUser && <p>Creating user: {optimisticUser.username}</p>} </div> ); }Error Handling
Proper error handling ensures that your application can gracefully handle failures in Server Actions.
// app/actions.ts 'use server'; export async function createUser(formData: FormData) { try { const user = await db.users.create({ data: formData }); return user; } catch (error) { throw new Error('Failed to create user'); } }Revalidating Data
Revalidation method is crucial for ensuring that the cached data remains fresh. Next.js provides two primary methods for revalidating data: revalidating by tag and revalidating by path.
Revalidating by Tag
Tags can be used to group related cache entries, which can then be invalidated together and can be fetched again.
Revalidating by Tag
// app/actions.ts 'use server'; import { revalidateTag } from 'next/cache'; export async function createUser(formData: FormData) { const user = await db.users.create({ data: formData }); revalidateTag('users'); return user; }Calling Revalidate Tag in a Client Component
// app/client-component.tsx 'use client'; import { createUser } from './actions'; export default function ClientComponent() { const handleSubmit = async (event) => { event.preventDefault(); const formData = new FormData(event.target); await createUser(formData); }; return ( <form onSubmit={handleSubmit}> <input type="text" name="username" required /> <button type="submit">Create User</button> </form> ); }Revalidating by Path
Paths can be revalidated to ensure specific routes are updated with fresh data.
Revalidating by Path
// app/actions.ts 'use server'; import { revalidatePath } from 'next/cache'; export async function createUser(formData: FormData) { const user = await db.users.create({ data: formData }); revalidatePath('/users'); return user; }Calling Revalidate Path in a Client Component
// app/client-component.tsx 'use client'; import { createUser } from './actions'; export default function ClientComponent() { const handleSubmit = async (event) => { event.preventDefault(); const formData = new FormData(event.target); await createUser(formData); }; return ( <form onSubmit={handleSubmit}> <input type="text" name="username" required /> <button type="submit">Create User</button> </form> ); }Understanding Revalidation with a Diagram
Here’s a diagram to help us visualize how revalidation works in Next.js 14:
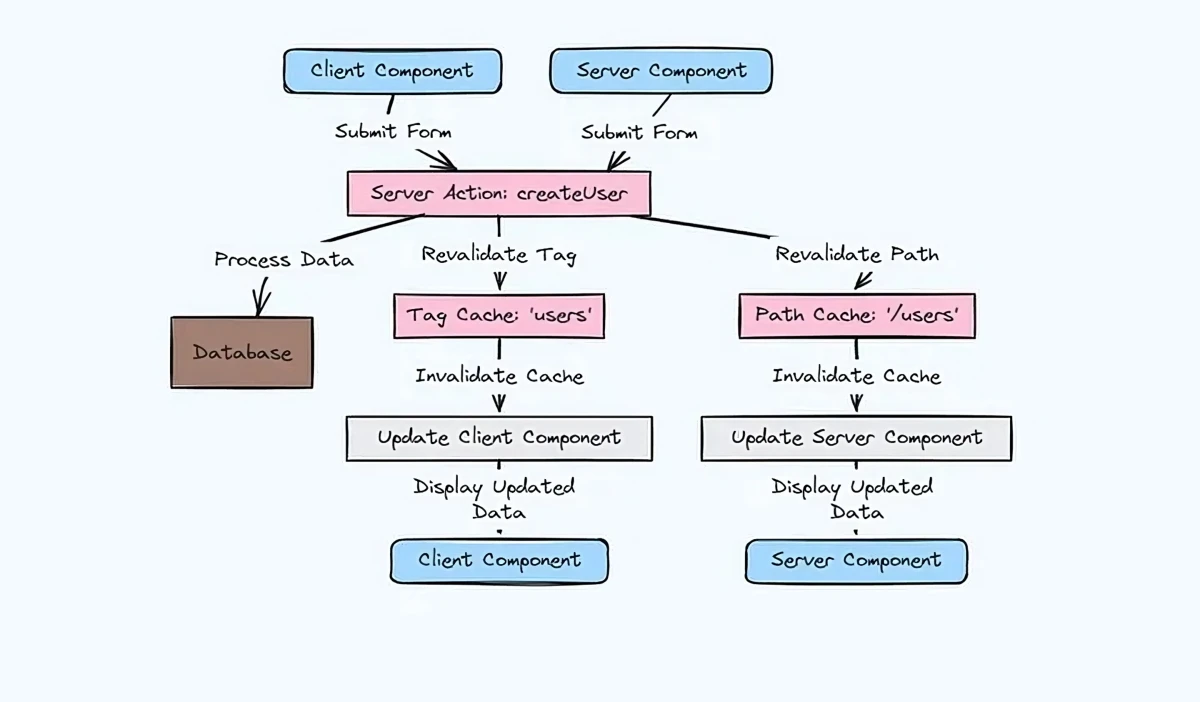
In this diagram:
The Client Component submits a form, triggering the
createUserServer Action.The Server Action processes the data and updates the database.
The Server Action then revalidates the tag ‘users’ and the path ‘/users’ to ensure that any cached data related to users is refreshed.
Conclusion
Server Actions in Next.js 14 offer a powerful and flexible way to handle server-side logic, making it easier to build secure, performant, and maintainable applications. They seamlessly integrate into workflows, benefiting not only software development but also areas like social media marketing and digital marketing by enabling efficient handling of dynamic content and user interactions. We’ve covered the basics and advanced usage of Server Actions, but the best way to master them is through practice and experimentation. So, try it yourself. Happy Coding 👨💻!!